Controller Schedule
July 30th, 2026
OTS with AK
1600 - 1730 PDT / 2300 - 0030 Zulu
Welcome to SAN_TWR! Just like initial ground training, this is where initial tower training takes place. SAN is a great playground for both VFR and IFR, and attracts a respectable amount of traffic on VATSIM. SAN is a beautiful airport surrounded by a city, shoreline, and other airports. As you know from Ground, SAN is almost always in West operations, so this article will mostly focus on West ops.
As the tower controller at SAN, you’ll get the dedicated airspace as shown below:
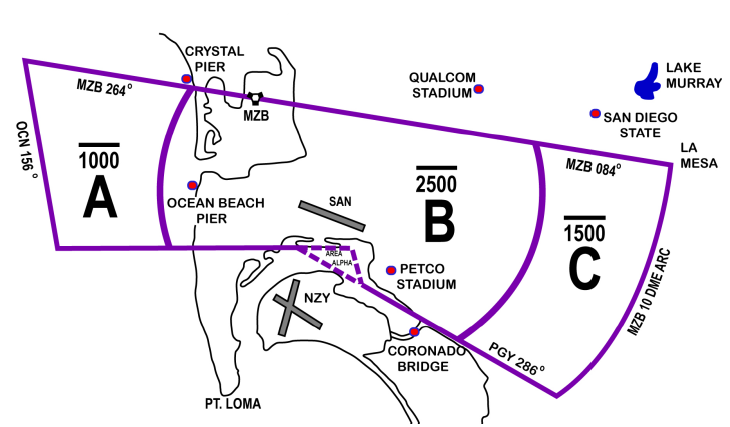
Let’s dissect this airspace map piece by piece.
SAN_TWR owns three sections of the San Diego Bravo surface area as depicted on the diagram. This is quite a large area to work with, meaning there is plenty of room to sequence and separate aircraft. However, remember that SAN_TWR’s airspace ceilings vary by area. Furthermore, always check the aircraft altitude! They might just be overflying your airspace.
Area Alpha is a triangular piece of airspace just south of SAN. It is not the airspace labeled “A” to the west, but rather the airspace labeled “Area Alpha” just south of Lindbergh Field. It is shared by SAN tower and NZY (North Island) tower, and comes in handy during the Bay Tour which takes place at NZY (more on this later). Because the airspace is shared, coordination between the SAN and NZY controller is required.
The VFR landmarks include the Ocean Beach Pier, PetCo Stadium, and more. The most important (these are the ones that should be memorized) are the Coronado Bridge, Crystal Pier, and Ocean Beach Pier, as they are common reporting points for aircraft looking to transition the Bravo airspace.
One landmark not depicted in the ZLA diagram of SAN_TWR is Mount Soledad. Mount Soledad is a hill just northwest of the MZB VOR, and is another common reporting point or holding point for VFR aircraft transitioning or waiting to transition the airspace.
As is often the case on VATSIM, it’s important to remember that different flight simulators will depict terrain and VFR landmarks differently and sometimes not at all.
SAN shares airspace borders with NZY and MYF (Montgomery) towers, and of course SoCal San Diego (oftentimes referred to as “West”). Due to the proximity of NZY, this is the tower you will be coordinating with most often. You may sometimes receive transitioning aircraft directly from MYF tower. Note that MYF or NZY can be staffed individually or, if a radar controller is on, they will be providing top-down services.
SAN has 9 SIDs (Standard Instrument Departures), but the following are used in West ops:
PADRZ, the northwest-bound RNAV (Area Navigation) SID
ZZOOO, the east and south-bound RNAV SID
PEBLE, the conventional version of PADRZ
BRDR, the conventional version of ZZOOO
CWARD, a northwest-bound RNAV SID generally used only for TEC routes
Any SID that eventually diverges will grant you diverging separation (1 mile for radar separation) every time. For example, an aircraft departing on the PADRZ after one departing the ZZOOO can be launched with only 1 mile between them.
As a tower controller, you won’t need to worry much about STARs (Standard Terminal Arrival Routes), as you receive aircraft already on the approach. Having a basic understanding of the popular STARs at KSAN (namely the COMIX and the LUCKI) will give you an idea of what to expect.
SAN has a very generous DVA. From the DVA SOP:

This means you can turn aircraft that you have control of almost anywhere within 12 miles without putting them directly towards the approach path. This can come in handy for producing diverging separation with aircraft on a radar vector.
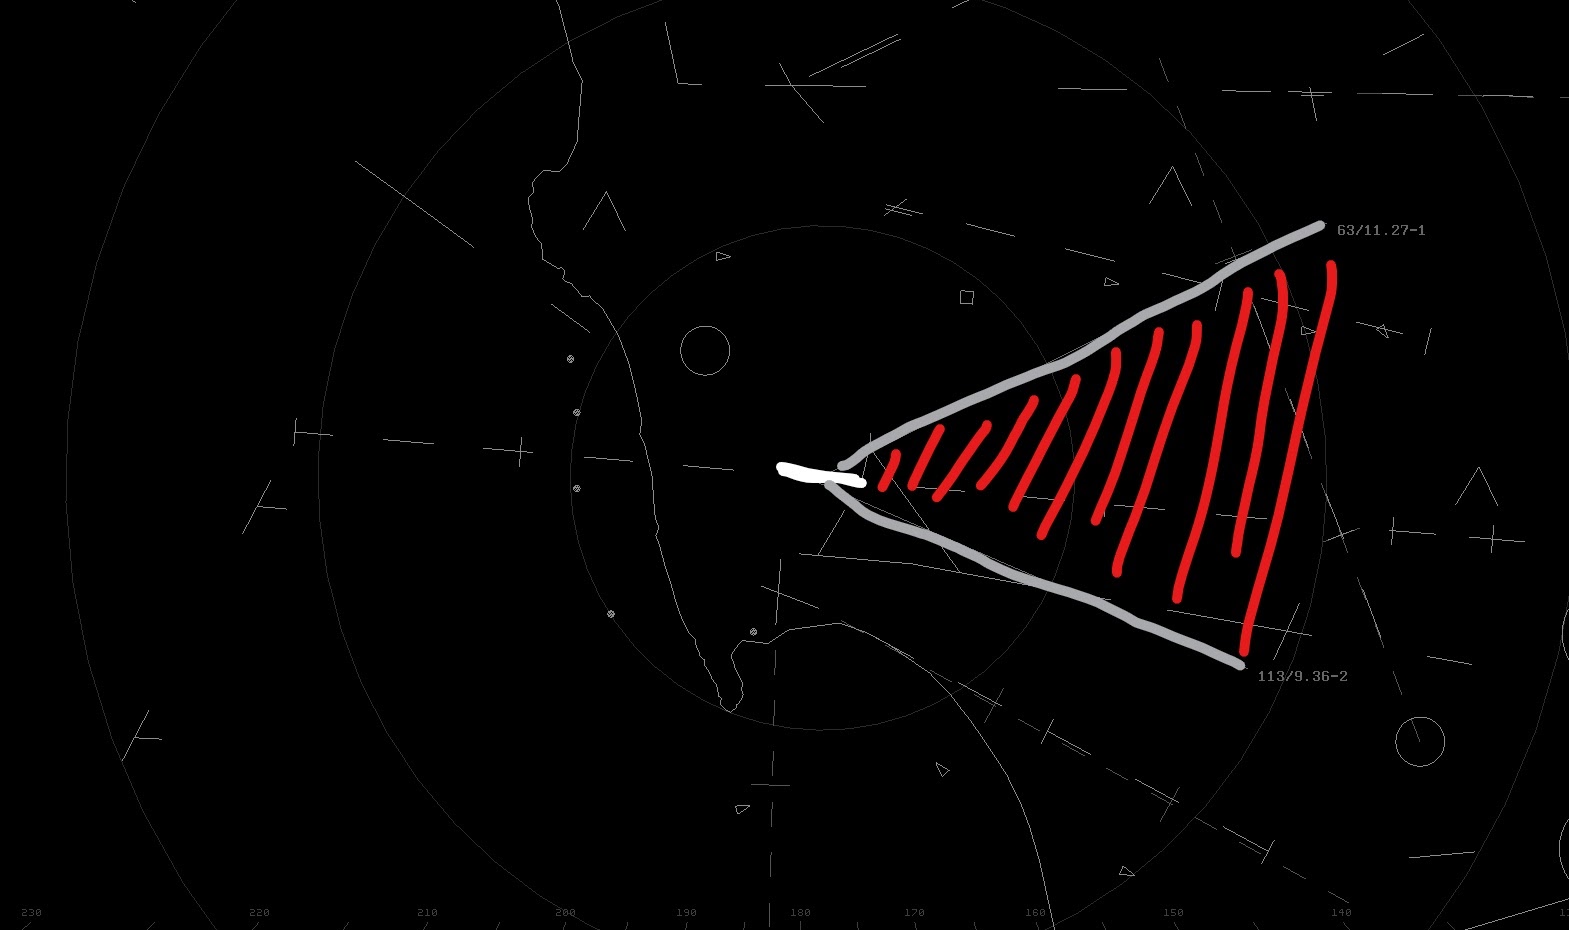
The red area represents headings that cannot be assigned from runway 27. The white is the runway at SAN.
However, keep in mind there is no such DVA for runway 9. Aircraft departing runway 9 will require the obstacle departure procedure (ODP) or a SID.
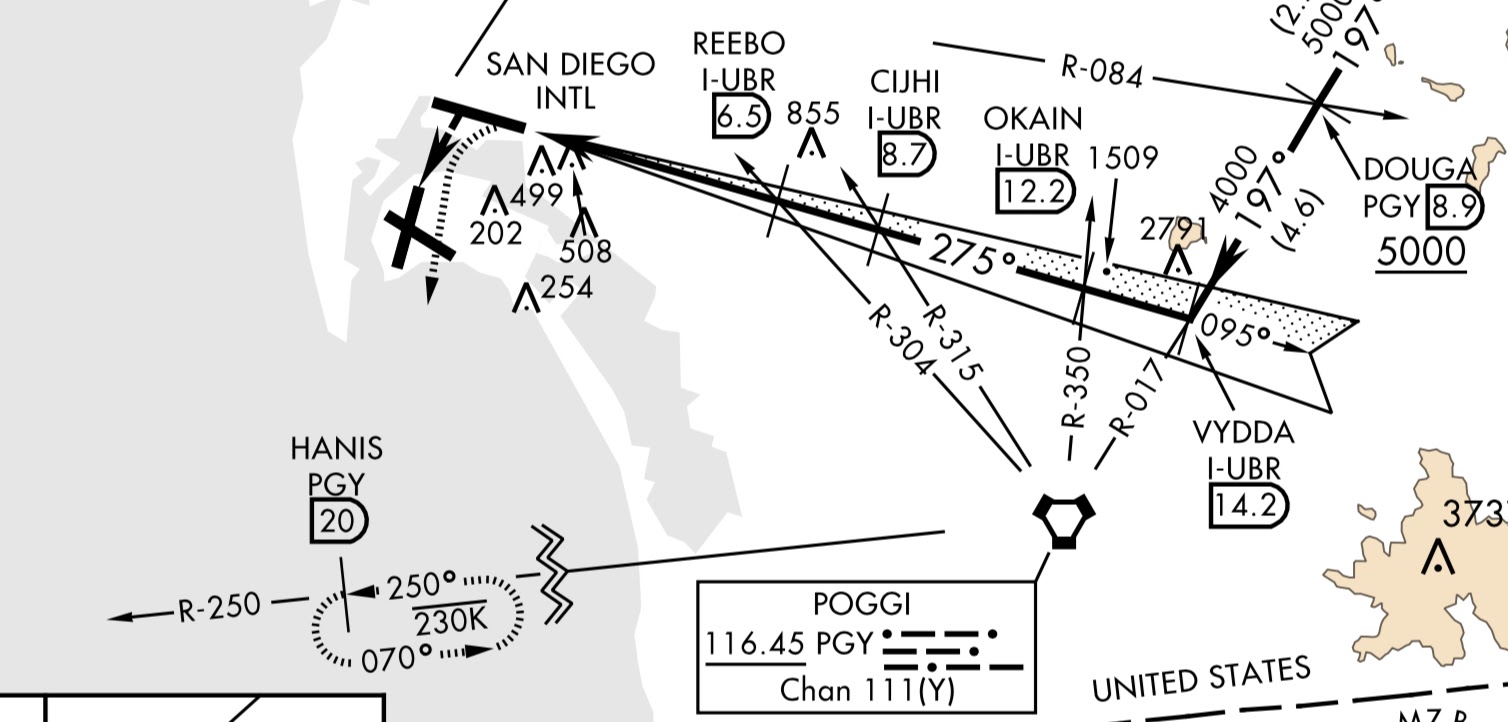
The LOC/DME-A and LOC/DME-B approaches to NZY use SAN’s runway 27 and runway 9 localizer respectively. The aircraft will circle to land a bit past midfield.
Once these aircraft are clear of any potential conflict, hand them off to the NZY controlling authority—there is absolutely no reason to hold onto them longer than necessary. Handoffs take time for both pilots and controllers to execute and it is YOUR responsibility to make sure there isn’t an airspace bust.
Sunny SAN is a perfect airport on VATSIM for VFR. Many ZOTSOT pilots will choose or be instructed to carry out VFR operations, so familiarity with them is critical.
Aircraft will always fly the pattern north of the airport (right pattern for runway 27) because of NZY’s airspace not far to the south. The standard pattern altitude for prop aircraft is 1200ft, and for jets 2000ft. The high speed and high altitude of jets means you will likely need a pointout to SoCal approach above you. The altitude for props also poses some challenges which we will get to later.
Both VFR departure headings are designed to achieve diverging separation. Convenient, isn’t it?
Arrivals are generally put in a downwind for runway 27 from the north, or a more direct entry from the east. Plan ahead so you aren’t caught off guard by an extra plane in the pattern. With multiple aircraft in the pattern, provide traffic advisories as necessary (https://laartcc.org/stm/traffic-information-and-visual-separation).
The Taxiway Delta transition is a popular Bravo airspace transition that involves aircraft overflying taxiway Delta at 1500ft. In the real world it is always done from the south, although on VATSIM some pilots will choose to fly it from the north.
Here is a time when one of the VFR reporting points comes in handy: the Coronado Bridge is often used as a holding point for VFR aircraft looking to transition northbound via the taxiway Delta transition.
This transition poses some separation challenges. Namely, transitioning aircraft may conflict with pattern traffic and aircraft executing a "go around." In this scenario, tower-applied visual separation is critical to safe and efficient operation of the airspace. By applying appropriate control visually to ensure aircraft are separated, radar separation minima can be safely disregarded. While this is perfectly acceptable for a real-world tower controller, VATSIM controllers do not always have the option to "look out the window." Consequently, radar separation minima and traffic pointouts still serve as important tools for separation in the VATSIM tower environment, but are by no means required if tower-applied visual separation is assured.
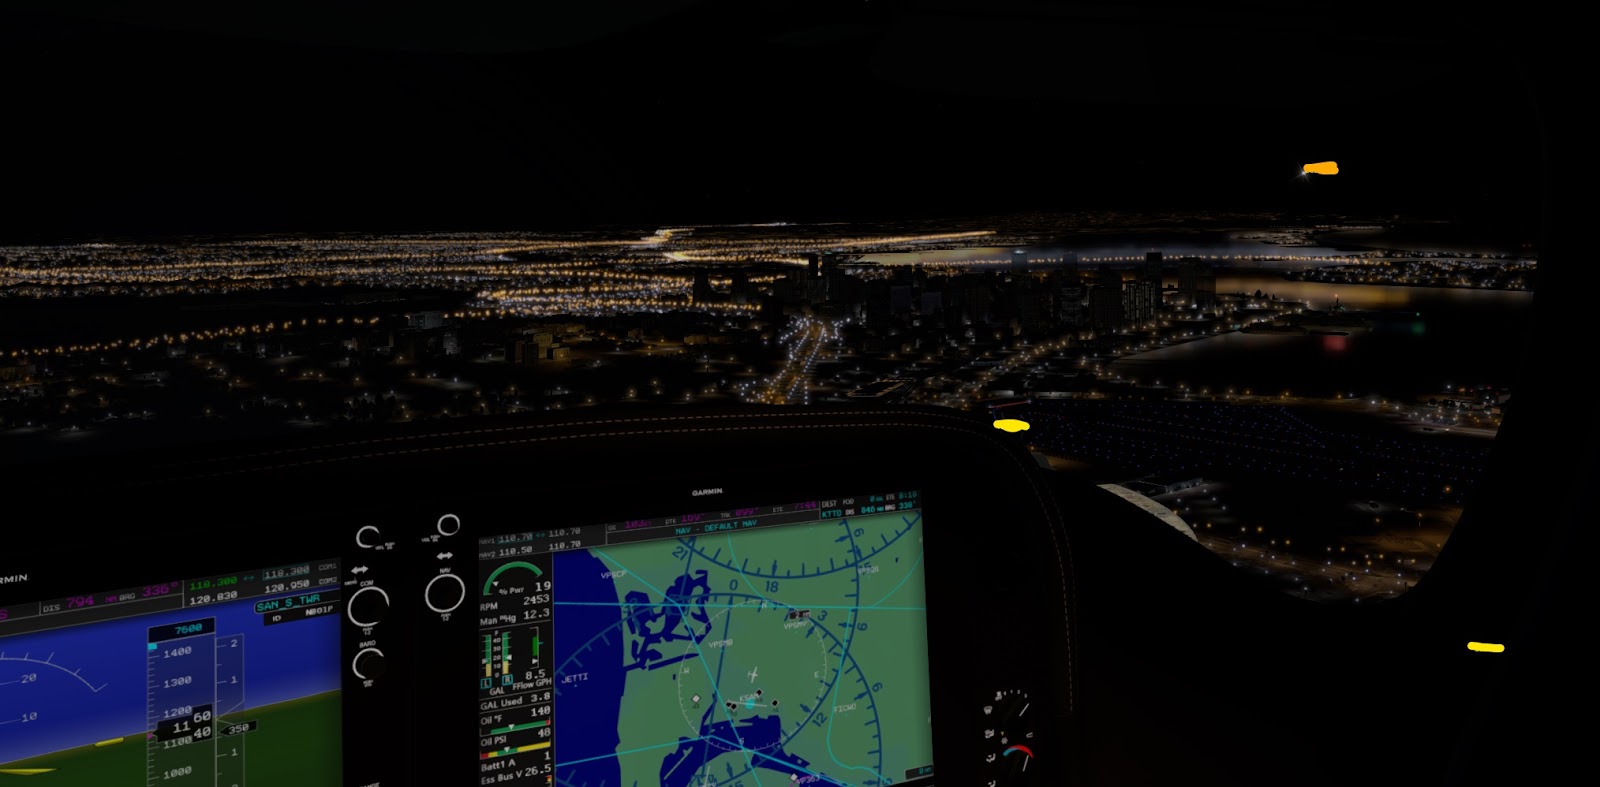
The relevant aircraft (transitioning aircraft) is highlighted in orange. The pattern aircraft (the POV of the picture) is flying directly towards the transitioning aircraft with little vertical separation.
Aircraft can be on an extended leg of the pattern to ensure separation with the transitioning aircraft. However, keep in mind that an extended upwind or crosswind may delay departing traffic. Remember that you can tell the pattern aircraft to make 360s or 270s to avoid unnecessarily long pattern legs. It’s also a good idea to time your transitioning aircraft such that the pattern aircraft doesn’t have to do much extending.
What about arriving IFR traffic? You can’t simply make them do a 360 and you have the same issue with go-arounds. In fact, this can be even more dangerous because air carriers travel much faster, and on go-arounds are instructed to climb through 1500ft all the way to 5000. However, you generally receive IFR aircraft further out, so you have more opportunities to time a VFR transition perfectly. Additionally, traffic pointouts can help ensure (VATSIM) tower-applied visual separation.
Remember that as a controller, you can deny a Bravo entrance of transition until you deem you can handle the workload. Leaving an airplane circling over the Coronado Bridge is perfectly fine — just don’t forget about them!
The offshore transition is a much less intrusive transition than the Taxiway D. It has aircraft follow the shoreline at or below 500ft AGL. The upshot of this is that the aircraft will be low enough that departures will climb right over them.
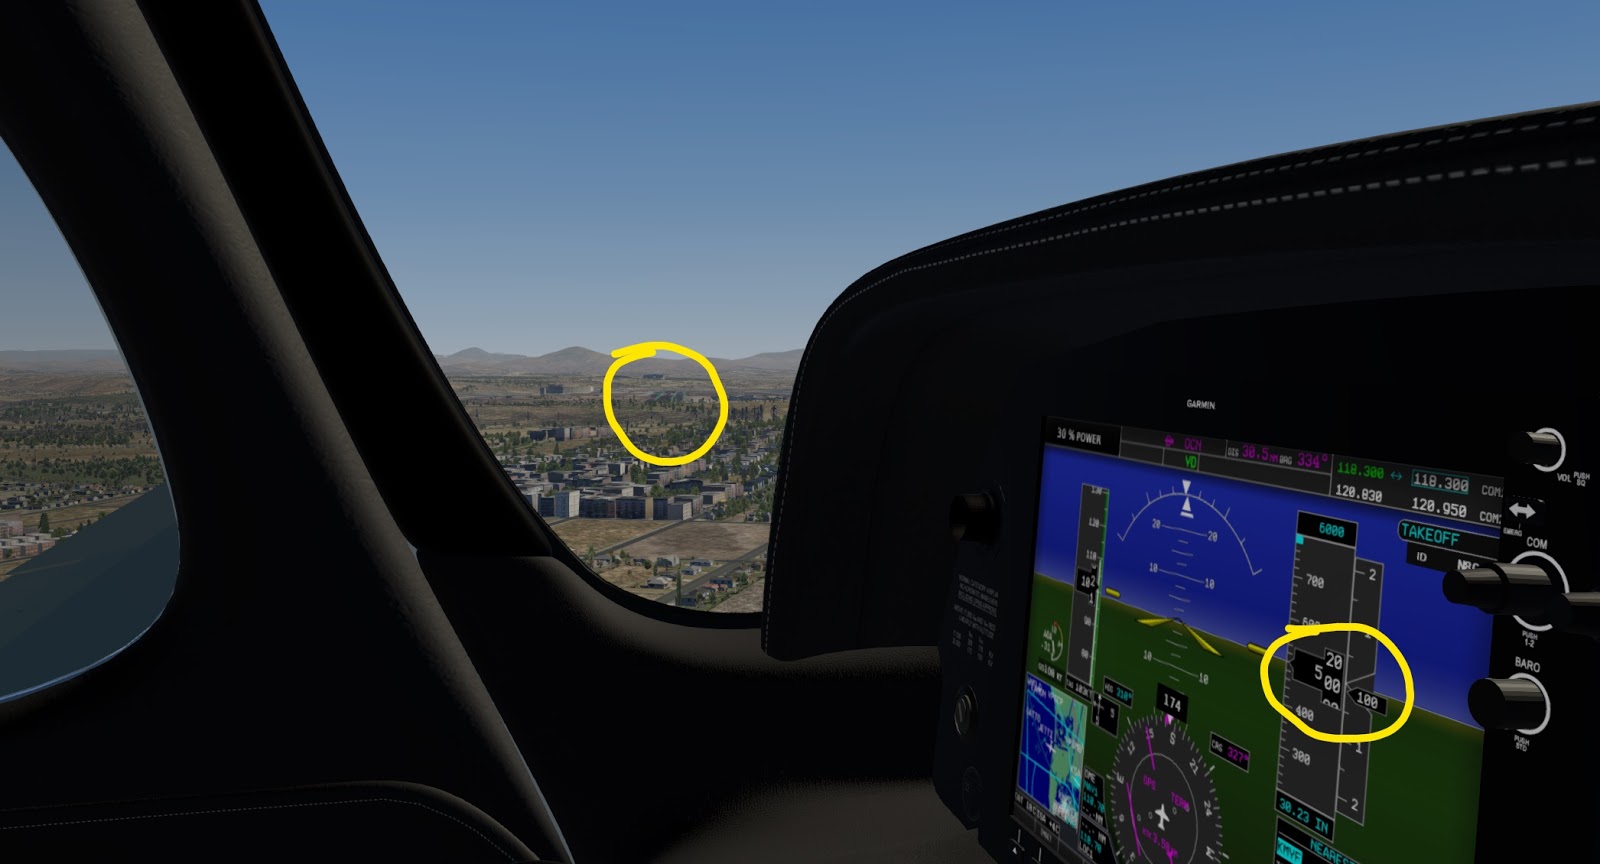
The aircraft on the transition (the POV of the picture) is low enough that an aircraft departing from SAN 4 miles away following minimum climb gradients (“400-2½ or std. w/min. climb of 353' per NM to 500”) would pass over the transitioning aircraft with no problems.
The offshore transition begins at the Crystal Pier, and ends a little south of the Ocean Beach Pier. Aircraft on the offshore transition is below the radar floor in the real world, so if you desire to simulate that, reporting points such as the Ocean Beach Pier should be used. Aircraft on this transition southbound will enter NZY’s airspace, so start your controller coordination as soon as possible.
This is especially important because the Offshore Transition flows nicely into the Bay Tour at NZY, and many pilots will take advantage of this. You should also expect an aircraft in Area Alpha with a Bravo clearance from NZY if this happens, and plan accordingly.
SAN is a great training airport, and with high traffic it can be quite challenging. However, armed with local knowledge, you will be more prepared to handle any kind of traffic.